Mac Os X Mavericks for Intel Pc Download Updated
Mac Os X Mavericks for Intel Pc Download
 If you're interested in running Mac OS 10, just you don't want to pay ridiculous prices for a normal Mac, and so a Hackintosh but might be for you. Correct now, the newest iteration of Bone X is 10.9, known as Mavericks. In this guide, nosotros'll show you how to install Mavericks on your PC with the newly released "Niresh" distro (also known every bit "Mavericks Zone").
The advantages of Unibeast vs. Niresh
Niresh is a distro, which is a pirated copy of Mac OS 10 that has been modified to work with a PC. Distros are a pop Hackintosh alternative to Unibeast, a better-known installation tool which requires a retail copy of Mac OS X instead. If y'all don't have any qualms with the legal problems regarding distros, they're actually the almost convenient mode to gear up upward your Hackintosh.

Dissimilar previous versions of Mac Os X, Apple tree released Bone X Mavericks onto the Mac App Store for free, meaning that the Unibeast method is now 100% gratuitous to use. However, using a distro to install Mac Os X withal offers a far share of advantages:
- Yous don't need a real Mac. Unibeast is a Mac app, so you need to have an existing Mac Bone X installation for it to work. This ordinarily means that y'all either have to find a existent Mac, or prepare a Mac virtual machine. However, with Niresh, you lot can merely set up everything from a Windows figurer.
- The mail-installation is easier. By default, Niresh will automatically install necessary Hackintosh-specific kexts and drivers for your computer when you boot your Mac Bone X installation for the first fourth dimension. Unibeast requires you to exercise this manually, using the Multibeast tool. While the mail service-installation in Niresh isn't perfect (y'all'll probably have to use Multibeast anyways), information technology's still a nice convenience.
- You can install information technology on a hard bulldoze that already has Windows installed. Past default, the Mac OS 10 installer volition not piece of work with hard drives that were originally formatted in Windows. Therefore, if your reckoner'south hard drive already has Windows installed on it, yous won't be able to install Mac OS X on there. Ordinarily, you can bypass this limitation on Unibeast past applying the MBR patch; however, Niresh does this for you automatically, saving you one extra step.
- Niresh supports AMD. Normally, computers that useAMD processors are unsupported past Mac OS 10. Nevertheless, Niresh includes experimental "patched" kernels that may allow Mac Bone X to work with these processors regardless.
Interested? Hither are the requirements:
- An existing Windows estimator/Mac/Hackintosh: This is the computer where you will download and set Niresh. The reckoner tin run either Windows or Mac OS X; both operating systems will piece of work.
- A Hackintosh-compatible computer with an empty hard drive: This is the computer where you will install OS X Mavericks. It can exist the same estimator as the 1 mentioned in the previous indicate. If your computer already has Mac OS Ten installed, Niresh volition merely update Bone X normally, without deleting any of your apps or files.
However, non every computer will piece of work with Mac Os X. Be sure to read the Hackintosh compatibility guide very carefully, to cheque whether or not your calculator qualifies. As well, Mac OS X needs its ain hard drive-- a minimum of ten GB of space is required, but at least 50 GB of space is recommended. It's preferred that you use a completely empty hard drive for this, but if your computer already has Windows installed on your hard drive, be certain to create an appropriate hd partition for OS X Mavericks beforehand (by post-obit Step i of our guide to MBR partitions).
- Niresh 10.9 (a.k.a. Mavericks Zone) (Gratuitous): Niresh is a "distro" of Bone X Mavericks that has been modified to work with PCs. You will need to use a bittorrent client to download the disk paradigm file, which is a little less than half dozen GB in size. On the Niresh website, you'll be given an choice to either download the "ISO Version" or the "USB version" of "Niresh - 10.9 - Mavericks". While either version will probably work, download the DMG version, but in case.
- An empty USB drive (6 GB or larger): In this guide, you volition write Niresh onto a USB drive, and boot your estimator from that drive to install OS 10 Mavericks. The USB drive must be at least 6 GB in size. Since you will demand to erase all of the files on the USB drive, make certain to back up its contents starting time. You lot can reuse this USB drive for normal stuff after you finish installing Mavericks.
- Win32 Disk Imager: (Costless): If you're using a Windows computer to set Niresh, you need to apply Win32 Deejay Imager to write the Niresh deejay paradigm file onto your USB drive.
- Multibeast (Gratis): Multibeast is a collection of kext files that your Hackintosh will need to run properly, later the initial installation. Be sure to download the newest version 6 of Multibeast, not the older versions iii, four, or 5 (which are for Snow Leopard, Lion, or Mount Lion respectively).
1a. Create your Niresh USB drive (Mac)
Follow this step if you lot're setting upwardly Niresh on a Mac or existing Hackintosh. Plug your USB bulldoze into Mac OS X, and open Disk Utility (located in Applications->Utilities in your chief hard bulldoze). Select your USB drive in the sidebar of Disk Utility, and erase the bulldoze. Yous can rename and format the drive any way you lot want-- information technology doesn't really affair.

Side by side, open your downloaded Niresh deejay image past double-clicking information technology; this file will probably exist named "OSX-Mavericks.dmg". And then, open Terminal (also located in Applications->Utilities), and type the following:
diskutil list
Press the enter/render key. This command will output a listing of drives currently connected to Mac Os X, including your USB bulldoze. Each drive is labeled with an identifier such equally "disk0", "disk1", etc. In the screenshot below, my USB drive (which is named "PIZZA") has the identifier "disk4". Remember this identifier.

Next, blazon the following commands:
diskutil unmountdisk /dev/"identifier"
sudo dd if="location of Niresh disk image" of=/dev/r"identifier" bs=1m
Replace "identifier" with the actual identifier of your USB drive (don't include the quotation marks), and replace "location of Niresh deejay image" with the actual file path of the Niresh disk image that you downloaded (also without quotation marks). In the screenshot above, my Niresh disk paradigm is located in the "Downloads" folder of my "Kitten" hard drive, so I typeif=/Volumes/Kitten/Downloads/OSX-Mavericks.dmg as function of the second control. Meanwhile, my USB drive had the disk4 identifier, so I blazonof=/dev/rdisk4 (don't forget the alphabetic character "r" before the identifier).
Press the enter/return key. Terminal will ask for your organization password. Afterward you enter your countersign, information technology will brainstorm writing the Niresh disk image onto the USB drive. This will probably take xv-30 minutes, though it may accept longer, depending on the speed of your USB drive. The final screen will exist frozen during the whole process-- this is normal! In one case it finishes, your USB drive volition incorporate a fully bootable version of the OS X Mavericks installer.
1b. Create your Niresh USB drive (Windows)
Follow this footstep if you're setting up Niresh on Windows. Plug your USB bulldoze into your computer, and open Window'south built-in Deejay Management utility. You tin can hands practise this past typing "partition" into your Outset Menu search bar and choosing the "Create and Format hard drive partitions" option.
You volition meet a list of drives connected to Windows. Right-click on your USB bulldoze, and click "Format". From hither, erase the USB drive (you can rename and format the drive whatever way you want-- information technology doesn't really matter).

Side by side, open Win32 Deejay Imager. Click the blue file icon on the app'south chief screen. In the Windows Explorer window that pops upward, select your downloaded Niresh disk image; this file will probably be named "OSX-Mavericks.dmg". (You will only be able to run across the file when you select the "*.*" choice in the "Files of type" field-- the default "Disk Images" option won't work)

Adjacent, select the device letter of your USB bulldoze, and click "Write".

Win32 Disk Imager will begin writing the Niresh disk prototype onto your USB drive. This will probably take 10-15 minutes, though it may take longer, depending on the speed of the drive. Once it finishes, your USB drive will contain a fully bootable version of the Bone X Mavericks installer.
two. Fix up the parts of your PC
I covered these steps in my Snowfall Leopard guide, but they're worth mentioning again:
- Unplug all USB-connected devices from your computer before you begin the setup (except your keyboard and mouse). A faulty external USB difficult bulldoze tin cause your Hackintosh bootloader to requite you EBIOS errors on startup.
- Open up your estimator and unplug any extra internal hard drives that your reckoner has, likewise the difficult drive that you're installing OS X on. (Just unplug the hard drive SATA cables from your motherboard.)
- If possible, connect your monitor to the DVI port of your computer's graphics. The Mac OS X installer sometimes has bug with HDMI and VGA.
NOTE: If you're installing Mac Bone Ten on a computer that already has Windows installed, you may have to enable AHCI for Windows beforehand. Otherwise, Windows won't boot later on. Also, after installing Mac OS X, y'all should also sync your clock on Windows with Mac OS Ten.
3. Set your motherboard's BIOS
The BIOS is basically a settings page for your motherboard. To enter the BIOS on my own computer'southward Gigabyte P67A-D3-B3 motherboard, I have to printing the delete key when information technology boots (before the operating system starts). Different manufacturers set up unlike keys for opening the BIOS.
Annotation: If you lot have a newer Gigabyte motherboard that uses the UEFI interface instead of BIOS, check out our guide for setting up the UEFI instead.

If your Hackintosh already has Mac OS X Snow Leopard, Lion, or Mountain Lion installed, the only thing you'll demand to change in the BIOS is the "Kick Device", so that your Niresh USB bulldoze has highest priority.
If your Hackintosh doesn't have any version of Mac Os X installed nonetheless, you have to change a few extra BIOS settings. Earlier starting, reset all of your BIOS settings to their factory defaults. On Gigabyte motherboards, you can reset your BIOS settings to their default past selecting "Load Optimized Defaults" on the principal page of the BIOS. Once your BIOS is running on its defaults, you need to change these iii settings:
Boot Device - Change the boot device of your figurer so that "USB-HDD" is first. You lot need to do this for Niresh to work. After you finish installing Mac Os X, you should alter this setting dorsum to default, so that "Hard disk" is the beginning boot device (this optional, but it volition speed up your kick times).
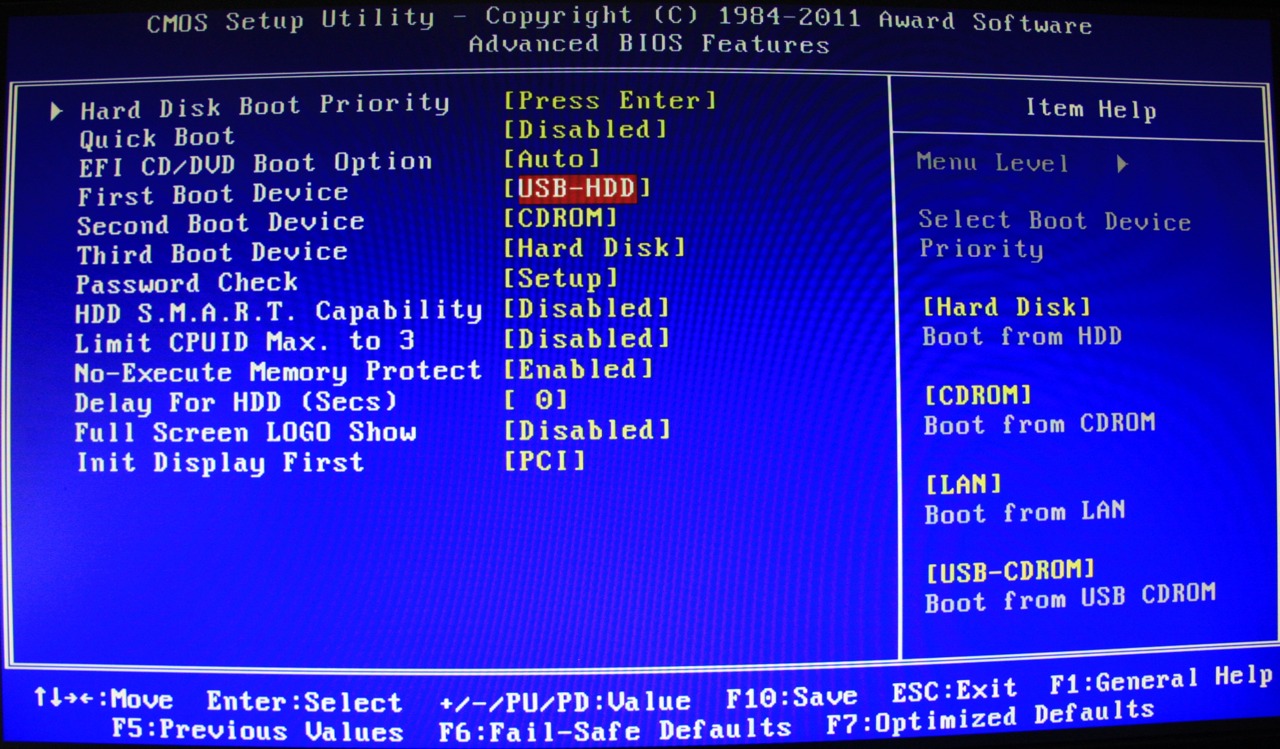
HPET - Change this to 64-fleck.

SATA Control Mode (your BIOS might call this a dissimilar name) - This will probably already be set to "SATA", "IDE", or "RAID". Alter it to "AHCI". Mac Os X merely works with AHCI.

Go along in mind that the BIOS on most motherboards practise not support using a mouse, so you'll probably have to navigate through the BIOS with the arrow keys on your keyboard. Printing "Enter" to change a selected option in the BIOS. On my Gigabyte motherboard, I have to press F10 to save my changes.
four. Kick into Niresh
Restart your Hackintosh, and plug in your Niresh USB drive. If things become well, your computer will boot from the USB drive instead of booting from your normal hard disk. Y'all will and then be able to view the Niresh carte.

If you exercise not manage to reach the Niresh menu, check your motherboard's BIOS settings to brand sure that the changes you made in Stride 3 were properly applied. If they were, just y'all still cannot boot from the Niresh USB drive, unplug your USB bulldoze, and get back to Pace 1. Reformat your USB drive with Deejay Utility and try over again. If all else fails, try using a different USB drive for Niresh.
At the Niresh menu, press the enter fundamental (or render key) to start the Os X Mavericks installer. The installer screen volition take several minutes to load. If you are trying to install Os X Mavericks on a figurer using an AMD processor, you'll accept totype the kicking flag "amd" or "amd64" (without quotation marks)-- which flag you need depends on your specific processor, and so test one flag a fourth dimension. Type the kicking flag "amdfx" (besides without quotation marks) if your AMD processor has "FX" in its model proper noun.

In the worst case scenarios, instead of loading the Mac Os X installer, you may stop up at a dark grey screen that tells you to restart your computer (a kernel panic), or y'all may end upwards with a small crossed-out sign (a loading mistake). If yous go a kernel panic/loading fault (or if the Mac OS X installer but won't starting time within 10 minutes), you'll demand to enter some boot flags. To enter kicking flags, manually restart your computer by pressing your computer's power push button. Then, once you've booted back into the Niresh menu, attempt typing whatever necessary boot flags before pressing the enter/return primal. Cheque out our listing ofcommon boot flags andour guide to fixing kicking problems with verbose mode for reference.
5. Install Mavericks
Once you've entered the OS 10 Mavericks installer, you will come up up to a folio that asks you for a "destination" for your Mavericks installation.

If you lot're installing Mavericks on a computer that has never been turned into a Hackintosh before (i.e. doesn't already have Snow Leopard, King of beasts, or Mountain Panthera leo installed), the hard drive selection box will exist blank. We'll have to prepare that. To do this, start upwardly Deejay Utility, which is located under the Utilities menu in the acme bar.
You need to use Deejay Utility to erase a difficult drive partition so that OS X Mavericks tin install itself on it. In the sidebar of Disk Utility, cull the difficult drive partition where you want Mavericks installed, and erase information technology by using the "Erase" tab. You tin can also just erase the entire difficult drive (this is the preferred solution if you don't plan to dual-boot Windows and Mac OS Ten from the same difficult bulldoze). In the screenshot below, my 2 hard drive partitions are called "Stuff" and "More Stuff", while my entire difficult drive is chosen "21.47 GB VMware Virtual".

When erasing, the format should be set up to "Mac Bone Extended (Journaled)". You lot can also partitioning the hard disk drive by using Disk Utility's Division tab.
Note: Mac Os X cannot boot from a partition that'south larger than 1 TB in size, then if you have a 2 TB difficult bulldoze, yous will have to sectionalisation information technology.
On the installation page for Mac OSX, the hd/disk sectionalization should now be showing up. Select it, and then click the "Customize" push button on the bottom left. This is where using a distro becomes really useful: Niresh allows you to install extra Hackintosh drivers and kexts, directly from the Os X Mavericks installer. The "Customize" page essentially does the same thing as Multibeast, though the layout (and most of the names of the options) are dissimilar.

However, choosing the right options from this page tin can be really tricky, so unless you're absolutely certain about which drivers and kexts you need to install for your computer, I don't recommend installing too much stuff from here. The default pick volition enable Mac OS X to boot from the hard drive without whatever assistance, and automatically enable audio and ethernet. For most computers, that will be enough.
If y'all wish to install more, refer to our guide to Multibeast. Otherwise, you can figure out the residual in Step 7, where you'll really fix your Hackintosh with Multibeast.
If your computer already has Mac OS Ten installed and you are just updating it to Mavericks, you can but uncheck all of these options. Mac Os X treats Mavericks as merely another update-- at that place's no need to reinstall all of your kexts and drivers.

Once you're done with the "Customize" page, install Mavericks. This volition take at to the lowest degree 30 minutes.
6. Boot into Mac OS 10
Once the installation finishes, remove your Niresh USB drive, and restart your estimator. At the boot screen, you'll meet an icon for the hard drive where y'all installed Mavericks. Select it (use the arrow keys on your computer) and press "Enter".

Mavericks will kick. Mission accomplished! In one case over again, if you get a kernel panic/loading error when you try to kicking your new Mavericks installation (or if the installation merely won't start inside ten minutes), you'll demand to enter some boot flags. To enter boot flags, manually restart your estimator by pressing your computer'south power button. And so, one time you've booted back into the Niresh card, try type whatever necessary kicking flags earlier pressing the enter/return key. Check out our list ofcommon boot flags andour guide to fixing kick problems with verbose mode for reference.
Once Mavericks has booted successfully, click through through the Mac Os 10 setup screens until you achieve the desktop. From here, Niresh volition work its magic, and automatically install the residuum of the Hackintosh-specific kexts and drivers from Step v.
.png)
Wait several minutes, while this process works in the background. Once you receive a notification saying that the installation has been completed, restart your computer.
7. Multibeast
Multibeast is a drove of kext files that you usually need to install for your Hackintosh to have audio, internet, a high resolution screen, and more. Different Hackintosh builds crave dissimilar Multibeast setups, though most setups are very like. Discover out what Multibeast options yous need to install. If you have a Gigabyte GA-P67A-D3-B3 motherboard similar me, bank check out my own Multibeast setup.

Since Niresh already installs a lot of necessary kexts for your Hackintosh automatically, you probably won't have to manually install audio or ethernet kexts with Multibeast. Even so, you may all the same want to use Multibeast to run UserDSDT, utilise a few actress fixes, etc.
If you're but updating your Hackintosh from an older version of Mac Os X, you don't have to reinstall UserDSDT, Easybeast, or Chimera in Multibeast after installing Mavericks. Mac Os X treats Mavericks as just another update. You lot might too take to reinstall miscellaneous kexts, such as TRIM Enabler (for SSDs).
To run Multibeast in Bone 10 Mavericks, you lot have to go the "Security" section of Arrangement Preferences in Mac OS X, go to the "General" section, and check "Anywhere" in the "Permit applications" department. After running Multibeast, you'll besides probably desire to change your BIOS settings back to normal (from Pace 3).
Once that'south done with, you should be running a fully functional copy of Bone X Mavericks on your PC. If you programme on updating Mac OS 10 in the futurity, check out our guide to updating your Hackintosh. Congratulations!
Mac Os X Mavericks for Intel Pc Download
Posted by: norrisniatand.blogspot.com
Post a Comment for "Mac Os X Mavericks for Intel Pc Download Updated"